


By Paul Uglum, president, Uglum Consulting, LLC
The most important function of plastic decorating is to impart a superior appearance to a product and to convey information to the customer. Above all else, the appearance of a product sends a message of quality and value. Any small blemish in the appearance has the potential of creating customer dissatisfaction. Visual excellence is often the first and most lasting impression the product will make.
Unfortunately, no decorating process is capable of absolute perfection and some processes, more than others, produce a number of parts that are unacceptable either due to performance or visual irregularities. It is therefore important to understand how to identify, communicate and ideally correct the decorating process to eliminate or significantly reduce these defects. All decorative processes involve applying a decorative material – usually an ink or paint – to a substrate. In doing this, there is a risk of visually observable anomalies that may or may not have a functional impact as well. In some cases, these are common across application technologies and in other cases, they are unique to the technology chosen. Different processes tend to produce different types of defects or produce them at differing rates. Appearance defects tend to be inherent to both the material sets and to the processes mechanism of applying the decoration to the part.
It is important to understand visual defects and work to eliminate them. The first step is to determine the issues with a given technology and to decide if they are significant, that is, important in determining the acceptability of the decorated part. This starts with agreement with the customer as to what constitutes an acceptable appearance. If the defect is cosmetic only, it can still be of significant importance to the customer and can impact customer satisfaction and the perceived value of the decorated object. To do this, it is best to use physical samples. Verbal or written descriptions and pictures alone often fail to adequately define acceptable limits.
A common language to describe a given defect is critical in clear communication and the assessment of the rate of occurrence. Unfortunately, the nomenclature of decorating defects is not highly standardized. In some cases, defects that appear identical can have very different root causes. Describing a lump on the surface of a part as dirt without establishing contamination as the root cause can lead to wasted time when seeing corrective action. It is best to describe the appearance without speculation as to the cause. Visual standards (workmanship standards or limit samples) can be very effective in important communication and preventing definition creep over time.
Causes
Visual defects are generally formed between the time the decorative material leaves the application technology (spray gun or print head for example) and before the material is fully dried or cured. The root causes may involve the surrounding environment as well as the materials and the application process. In some cases, defects may originate with the condition of the part to be decorated. Often, defects with different root causes may look the same or similar so some subsequent analysis will be needed to determine the root cause and corrective action.
Defect analysis can involve microscopic examination, sectioning and the use of various analytical tools such as FTIR. Several good books have been written about defects and their analysis.

Decorated parts can be produced using a sequence of operations involving differing technologies and materials. Compatibility of sequentially applied plastic decoration processes and materials is also of importance. Care must be taken to make sure that they do not add to process defects during subsequent operations. The addition of a high gloss topcoat may, for example, make minor appearance issues from the previous process become very visible. Compatibility of solvent systems and recoatability over time also can have a significant impact on the success or failure of sequential processes. The time between process steps and effectiveness of drying processes also can contribute to failures.
When working to eliminate a cosmetic defect there are three steps: identify the defect, determine the root cause and, finally, change the process to eliminate or reduce
the defect.
Inspection and identification
Visual inspection often is the best way to monitor the process. Unfortunately, visual inspection is, at best, not a reliable quality control method. Even multiple pass inspections can miss defects. Still, with all of its faults, human inspection is the most versatile in picking up any number of potential issues related to appearance. Vision systems need to be programed to look for specific issues and do not see the part in its totality. Human inspection allows the addition of new categories when previously unencountered visual anomalies occur.
To be effective, a visual inspection process must have clearly defined standards. There must be a clearly defined nomenclature used across the enterprise and finally there must be a program to ensure the employees doing the inspection are consistent over time. A typical standard is no visible surface defects when viewed for a specified time under controlled conditions of viewing time, distance and lighting.
Typical inspection conditions include lighting of about 1,000 lumens per square meter at the part and an inspection distance comparable to the distance the part is normally viewed at – typically arm’s length. If color is the issue being evaluated, the color of the surroundings also is important. In some cases, it is important to rotate the part to change the angle of lighting during the evaluation.
Parts with obvious defects are unacceptable. Over time, with parts having defects that are barely visible or visible only with magnification, the line between good and unacceptable parts tends to blur. In order to prevent this, ongoing training of inspectors is important. Data should be collected and tracked as parts are produced and examples of defective parts should be retained for analysis any time the defect rate increases significantly.
VDA 16, Quality Management in the Automotive Industry – Decorative Surfaces of Accessories and Functional Parts in the Exterior and Interior Areas of Automobiles, 3rd revised edition (2016), provides useful insight into evaluating parts and characterizing observable defects. This specification recommends evaluation conditions, feature definitions and approach to defects and acceptance criteria. Although focused on the automotive industry, the guidance is applicable to many market segments.
Evaluation and elimination
Once a defect is identified it is important to assign a cause. Defects can arise from variation in the decorative paints or inks, application process, errors in setup variation in the quality of the parts being decorated.
Analyze the defect for clues and examine the manufacturing line and decorating process to understand just when and how the defect occurs. Tools such as Six Sigma and Shainin problem solving can be effective in isolating the problem and its cause. The Shainin technique, called a dictionary split, is very useful in identifying the specific point in the process sequence where the defect occurs. Five why’s, fault trees and other root cause analysis tools also are effective. Create a pareto chart of the defects to determine which to work on first.
During the development phase, it is not unusual to encounter any number of visible anomalies. Best practice is to both document the causes and corrective actions as well as collect samples that can later be used as limit samples and physical examples of specific defects.
Reference materials
References on defects – their causes and corrections – vary with technology. Since coating processes are the most common, a wider variety of references are available. An older but still useful reference is Spray Paint Defects – Their Cause and Cure by Dr Gerald Schneberger. The section on defects in coatings processes and applied coatings in the Basics of Coating Technology by Artur Goldschmidt and Hans-Joachim Streitberger also is very good. When considering pad printing, the recent book, Pad Printing is a Science (Not an Art) by John Kaverman has a useful chapter on diagnosing and correcting pad printing defects. Ink, paint and equipment manufacturers, in printed form and on their websites, also publish guidance on common issues and problem solving.
Inkjet decorating of parts is still relatively young, as decorating processes go, and because of the low viscosity of the inks and small drop size it has a number of failure modes that other technologies usually do not have to deal with. Both static charge on the decorated surface and air movement can deflect the ink and cause blurred edges and images. The low viscosity of the inks can cause issues with poor coverage and sags. Since ink jetting is a fairly complex process, many of the variables are dependent upon each other. Resolving one issue, without looking at the system in its entirety, can lead to additional issues.
Common defects
Lumps in painted parts are a good example of defects that can have more than one potential cause. Sectioning and microscopic examination are required to determine what is causing the lump. Dirt or fibers are two possible causes that can be tracked back to actual sources and cleanliness in general. Cellulose fibers often originate with packaging and cotton and synthetics with clothing or cleaning materials. When the contaminant is paint itself, there can be many sources ranging from agglomerations at the paint gun to fragments of paint coming off the fixtures or surrounding paint booth. In all cases, identification of where in the process the defect is occurring and what material is causing the defect are the starting points in eliminating the problem.
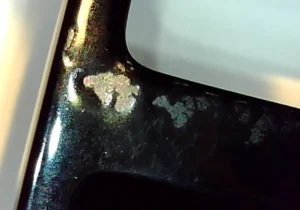
Bleed-through staining can take several forms. It often is observed as a discoloration or change in gloss on the surface of the part after decoration. It can result from molding defects in the plastic such as molded in stress and splay. Solvents in the decorative materials can relieve stress in the plastic part leading to blush or, in the worst-case scenario, cracking of the part. Bleed through also can happen when materials in the substrate migrate up and into the decorative surface.
Bubbles can be induced in the mixing process or result from outgassing or incorrect process parameters. Although coating issues like fat edge and orange peel are primarily related to material choices, application method and drying processes can have a pronounced effect on how visible the issues are. Process settings and environment changes should be monitored and reviewed if the appearance changes.
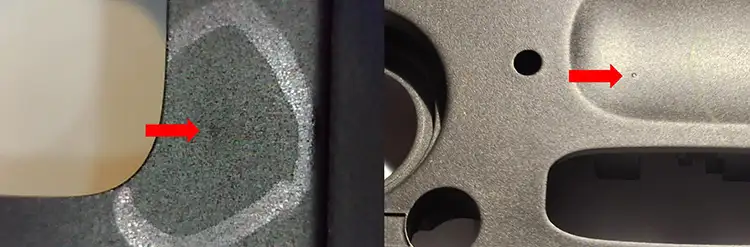
Contamination on the surface can lead to de-wetting or failure to coat parts of the product. As with other defects, it is useful to map were the defect is occurring to determine if it is always in the same location or randomly located.
Not every visual defect comes from the process itself, some come from storage and shipping. In-plant handling, shipping and packaging also can lead to visual defects. Depending upon the chemistry and the cure system used, parts may not achieve their full strength until hours after they are manufactured. In addition, solvents still present in paints and inks can cause the decoration to reflow if a protective film is applied too soon after manufacturing. These failures should be designed out during the development phase but can occur when changes are made to the manufacturing processes.
This is only a short introduction to some of the many process-induced issues that can arise in decorating plastic parts. It is best to become familiar with the causes and corrective actions needed to resolve the issue and to constantly monitor manufacturing processes to seek continuous improvement and to identify new issues quickly. If issues do reach a customer, it is important to collect and examine the escaped parts. Relying on verbal descriptions or photographs alone to diagnose the issue can lead to false conclusions as to the root cause. In working with defect resolution, it is always best to go to the manufacturing line and not rely on the reports of others.
In dealing with visible defects, be proactive. Create a robust process of inspection and institutionalize continuous improvement through defect identification and elimination.
Paul Uglum has 43 years of experience in various aspects of plastic materials, plastic decoration, joining and failure analysis. He owns Uglum Consulting, LLC, working in the areas of plastic decoration and optical bonding. For more information, send comments and questions to paul.a.uglum@gmail.com.