by Ted Van Horn, sales engineer, Engineered Printing Solutions
Pad printing still is the most efficient, cost effective and reliable method for many plastic decorating projects. And, for some of the more difficult materials to print on – such as certain medical device applications and oddly shaped parts – it remains the only option available.
Ideally, the process for determining the right equipment for a pad printing project – or determining if existing equipment can handle the job – is a collaboration between the customer and the equipment builder. Built properly and with the right specifications, pad printing is a clean and relatively simple way of decorating plastic products that can be used to print everything from bar codes and spot-colored logos to 360° wraps and full CYMK process color images.
 The purpose of this article is to help pad printing customers understand the information the equipment builder needs to begin the process of working together to design and build the appropriate equipment.
When first approached with a new project or when asked if an existing machine can print a new application, the first questions normally asked by Engineered Printing Solutions are as follows:
- How large is the image that needs to be printed?
- How many colors will be printed per image?
- What is the size / shape of the part and the location of the image?
- What material will the printing be on?
- How many different parts will be printed, and how frequently will the parts be changed over?
- How fast (parts per hour) do the parts need to be printed?
How large is the image that needs to be printed?
The majority of pad printers come equipped with a particular size of round sealed cup that can have an outside diameter of anywhere from 60mm to 300mm. The image area that is able to be printed will be determined primarily by how large a cup (or cups) the machine is fitted with. Keep in mind that the size of the sealed cups is measured by the outside diameter, but actual printable area will be less than the stated size of the cup due to the need to compress the pads further than the print area, as well as the thin line of ink that is left behind as the cup cycles back and forth. This area usually is about 10mm to 15mm less, depending upon the image size and shape and how far outside the print area the pad needs to compress.
Machines fitted with oval shaped cups (as well as cupslide or transverse machines) also are available for printing larger images, but the size of the image that can be printed with these types of machines still will be determined somewhat by the outside diameter of the sealed cup on the machine. For the equipment builder, knowing the largest image size that will be printed is the first step in recommending equipment.
How many colors will be printed per image?
The pad printing machine will come equipped with one sealed cup, cliché support (in most cases) and pad for each color that will be printed. While ink colors can be changed out, the number of sealed cups the machine has will determine how many colors can be printed per image. And, when printing more than one color, the machine will need either a pad or part shuttle to register each individual color. It is possible for equipment manufacturers to work with customers to develop a machine that can print more colors, including a recent project where up to 14 colors could be printed on a catheter with 14 individual sealed cups, each holding one color.
Process color printing is possible with pad printers using blending or translucent CMYK colored inks. If the part is white, the machine must be equipped with four cups – one for each of the CYMK inks – and if the part is a darker color, the machine needs five cups – one for a white ink as a base and another four cups for the CYMK. Most applications will require one, two or three colors – all of which are possible using standard machines with pneumatic pad shuttles to register the individual colors. Knowing the number of colors that will need to be printed will let the equipment builder know how many sealed cups the machine needs and whether the pads or part needs to move in order to register the colors.
What is the size / shape of the part and the location of the image?
Pad printing machines can be designed to print onto irregular-shaped and larger-size parts, on concave or convex areas, and around a radius. A general rule of thumb is that for a machine designed to do a “straight hit” with no rotation of the part or pad movement during the print cycle, the machines will be able to wrap an image approximately 90° around a circumference without distortion of the image. In determining the right equipment for a pad printing project, the horizontal reach of the pad onto the part and the vertical stroke of the pad transferring the image need to be long enough to print onto the correct location.
Note that the image size, the number of colors and the shape of the part also will determine the compression force needed with the machine. Whenever the size of the image or number of colors increases, the pad printing machine needs additional compression force to be able to compress the larger-size pad or pads to transfer the complete image. Pad printing equipment can be built large enough to print on satellite TV dishes, propane tanks or arterial catheters that require a continuous print length of up to 1600mm. Horizontal pad printers also are available where the pad rotates up 90° to print on the side of parts. These types of machines typically are placed in-line. The correct information on the size of the part and location of the image will allow the equipment builder to ensure that the machine has enough reach and compression for the job.
What material will the printing be on?
With pad printing, good adhesion can be achieved on almost any material with the right ink, thinner and bonding agents, but some materials still need to be pretreated for optimal adhesion. The most common surface pretreatments are chemical pre-wipes, flame, corona or plasma. An equipment provider can determine which steps might be needed by test printing, but it’s important to make sure the material sent to be tested is identical to the one that will be used in production. This testing is usually free of charge and is necessary to determine if any pre- or post-print processes need to be added to the equipment.
How many different parts will be printed, and how frequently will the parts be changed over?
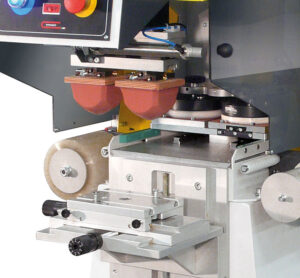 Knowing each of the parts the machine will be printing at the beginning of the project helps ensure the machine is capable of printing on all of them. The length of the production runs for each part, as well as the frequency of changeovers, will determine fixturing needs and the optimal level of automation. While fully automated pad printing machines offer the fastest throughput, if parts will be changed over frequently then the changeover time between products might make the cost and higher speed of automation a less viable option.
One of the more recent advances in pad printing equipment is the use of servo motors vs. the standard electropneumatic actuators. These can be used for the cupslide mechanism, fixturing, fixture table and Y and Z axis of the pad bar, thus making the settings for each programable.
How fast (parts per hour) do the parts need to be printed?
When fully automated, almost all manually loaded and unloaded pad printing machines for one- or two-color printing will cycle faster than operators can load and unload the parts. Actual production rates for manually loaded and unloaded machines will be determined by how fast operators can load and unload the parts.
The limiting factor for the print cycle time is the amount of time needed for the ink to “tack up” sufficiently to be picked up by the pad off of the cliché and then transferred from the pad to the part. While the ambient conditions, type of ink and thinner used (as well as the depth of the plate etching) all contribute to cycle times, a good estimate is that the pad printer can complete a print cycle per color in approximately three to four seconds. For faster printing production rates and for printing more than three colors, a full range of semi- and fully automated systems are available.
In summary, while new types of print technologies continue to improve and widen the range of products that can be printed, pad printing still is the best – and, in many cases, the only – option available for many applications. This article summarizes the initial questions and information needed to begin the process of designing the right equipment for any pad printing project.
 Ted Van Horn has worked for most of the last 16 years as a sales engineer for Engineered Printing Solutions, East Dorset, Vermont, and has extensive experience in pad and inkjet printing equipment technology, from the initial customer consultation and system design to machine build and installation. He has worked primarily in the plastic molding industry, with a specialty in medical devices. Engineered Printing Equipment is an industry leader for pad printing, multi-pass inkjet printing and single-pass inkjet printing equipment and supplies. Van Horn can be reached at 714.313.3878, [email protected] or www.epsvt.com.
