by Paul Uglum, president, Uglum Consulting, LLC
A quote attributed to the Shakers from around 1790 states that all things made for sale ought to be well done and suitable for their use. Everyone wants the decorated plastic products they make to be attractive and work well in the intended application. The question then is how to evaluate the design choices, material choices and process choices to be sure they meet customer expectations. The answer is testing.

Unfortunately, testing is not always well understood or applied appropriately. If done correctly testing will enable success. If not done correctly, it will lead to rejection of good solutions or lead to a false sense of security.
When asked why parts are tested, engineers’ answers will range from, “Because my customer requires it,” to “It enables good process control and decision making.” Reasons for testing can include selecting between various decoration options, verifying the parts made meet the customer’s specifications and performance requirements, meeting regulatory certification requirements and, of course, process control.
In order to accomplish these goals, it is important to understand the tests and what they reveal about the performance of the decoration.
No one test answers all of the questions
It should be clear that no one test will provide all of the answers to the question, “Is the product robust?” To that end, test protocols often include a series of tests designed to prove the parts meet initial requirements and will perform acceptably when used. Test specifications usually consist of a collection of test methods and a definition of the pass/fail criteria for the tests.
Test methods can be grouped into a number of categories. Conformance tests measure appearance or physical characteristics. These tests demonstrate that the decoration meets the customer’s specifications. Changes in these characteristics often are used as evaluation criteria for other tests. Performance tests, which often are based upon the intended use environment, measure if the decoration will survive under use and environmental extremes. Accelerated tests use additional stresses (often temperature) to replicate long-term life performance over a shorter test time. Special care must be taken with this class of tests to ensure they are only reducing testing time and not introducing unrealistic failure modes that will not be experienced in the field.
Finally, testing can involve combined stresses, such as simultaneous exposure to a number of stresses, to better reproduce the actual environmental extremes. Weathering testing is a good example of combined stresses, often combining light exposure, temperature and humidity.
Establishing the standards
Most often, the customer of the decorated part will provide a set of requirements. Those standards must be met. It is a good idea to make sure there are no failure modes the customer may have missed, or is not aware of, that would lead to problems later. This is especially true when offering solutions that are technically different from the ones proposed by the customer or when a number of technologies are used to produce the decorated part.
Failures can be due to the technology chosen and also the design, the substrate and the process. All must be correct in order to have a robust decorated part.
The best way to develop effective testing is to understand the weaknesses of the technology being used and to understand the environment in which it eventually will be used. When looking at the technology, it is important to understand just what it is exposed to over its entire life, from manufacturing through the expected end of life in the field.
Useful tools – in thinking about and documenting test methods – include both an understanding of the technology in question and actual use conditions, including field data when possible. Design failure mode, effects analysis and process failure mode systematically identify potential risks associated with them. Identify as many failure modes as possible, as well as their causes and effects. By understanding the failure modes, it is possible to identify the appropriate tests to see if these occur.
International standards organizations ASTM and ISO have many published test methods that contain much useful information on their application and limits. Industry specific organizations also create and validate test methods. Testing literature, such as “Accelerated Testing” by Ulrich Schulz and “Paint and Coating Testing Manual,” edited by Joseph Koleske, can provide additional insight and are useful in selecting the best techniques. New methods are continually being developed, so it is important to look at more than one source.
Comparing options
When comparing technologies or material choices within a technology, look for the best outcome. From the business side, this is yield, cost and ease of manufacturing. From the performance side, it also is important to look at a balanced solution. No one option will be best in all conditions. It is important to consider the risk, frequency and extent of the exposure, and, as a result, the amount of damage done by the exposure. This information can be used to determine the relative importance of each test. Very frequent occurrences with a high amount of resulting damage are the most important to design out.
When selecting between options in the same technology, it is helpful to use the same set of tests. When comparing options between differing technologies, it is critical to run both the tests that define performance and the environment, as well as tests that look at the specific weaknesses of each technology. For plated plastic, temperature cycling and thermal shock evaluate the effects of differing expansion coefficients. For physical vapor deposition (PVD), the weakest point would be abrasion of the metal or damage to the protective coating. Both have to survive in the same environment but tend to fail in different ways.
If screening a large number of options, it often is useful to run a limited number of tests, using the most important and/or difficult-to-pass tests to eliminate the worst performing options.
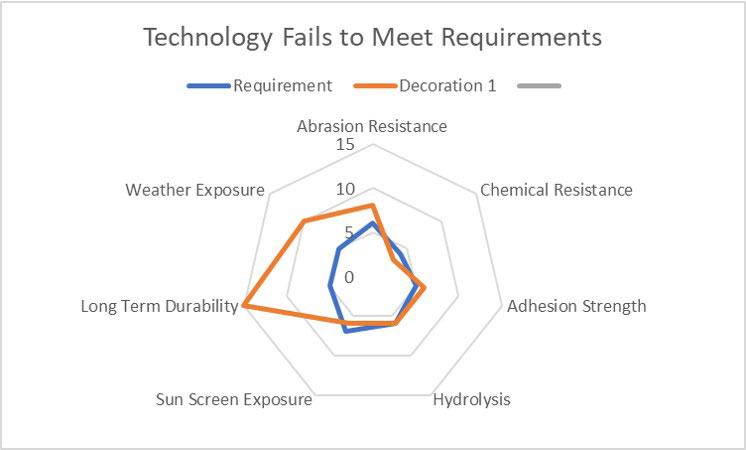
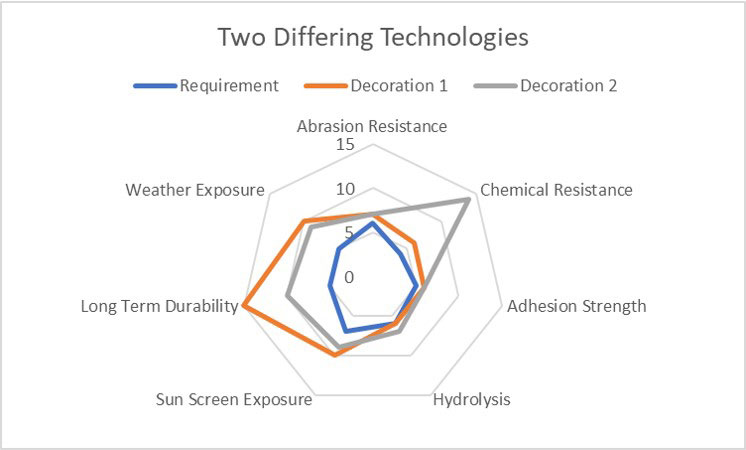
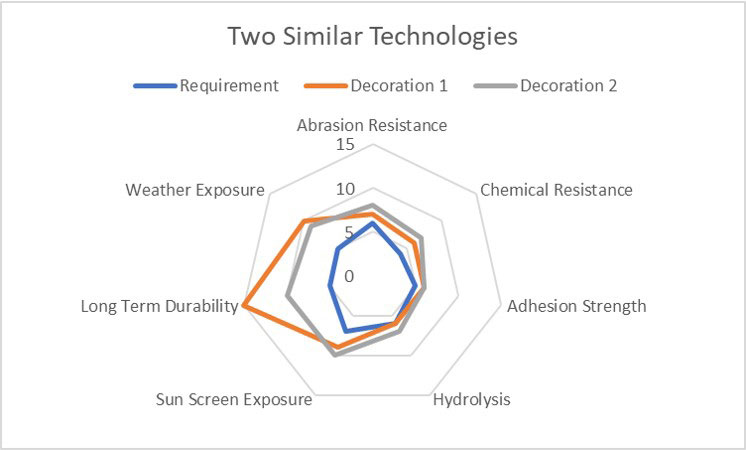
One useful way to visually look at options is radar diagrams. They are most useful when there is variable data and comparing two similar processes. Figure 1 shows a technology that fails to meet the requirements; Figure 2 compares two differing technologies. Figure 3 compares two similar technologies that meet the requirements. Final decisions on which is the best need to be based on what is most important to the final application as well as meeting the specification.
Some characteristics have many testing options
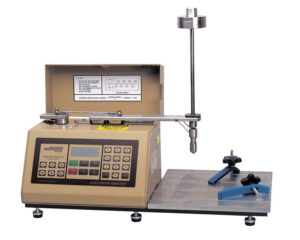
It is important to select the best tests to replicate the environment the decorated plastic will see. Wear testing is a very good example of where many test options are available, some of which better discriminate field performance than others. It is important to choose the ones that are appropriate for each application. Wear can take many forms, ranging from rubbing during shipping to repeated cleaning to one-time sharp impact from abuse. It is best to test for all anticipated causes.
Equipment ranges from very sophisticated and costly to very simple. Nano scratch testers, steel wool tests, linear testers, crock meters, fingernail tests and coin tests are but a few. Tabor Industries produces many instruments called out in ASTM and ISO methods and can be a good resource in selecting the proper equipment to evaluate decorated parts (Figure 4).
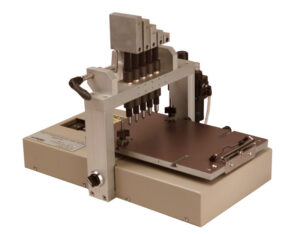
As with other test methods, it is important to understand what the test is doing and how it correlates to the real world. End points that are a visual evaluation can be difficult to replicate. Decorative coatings and finishes often are thin, and, rather than testing the decoration, the deformation of the plastic underneath is observed. The higher Newton force levels on the five-finger test tend to deform the plastic underneath the decoration and so do not provide an easy-to-evaluate response (Figure 5).
Some tests fall short in a number of ways
Many tests are one-sided. That is, they only provide pass/fail information. They answer the question: Does the decoration last for at least so long without failing when exposed to a stress? While this can provide an acceptable measure of field performance, it does little to provide a means of comparing two competing variants of the same technology. The best choices are tests that provide variable data, such as time to failure or a ladder ranking of chemical exposure.
Tests also must be accurate and precise. Accuracy refers to how close a measurement is to the true or accepted value. Precision refers to how close measurements of the same item are to each other. Precision is independent of accuracy. Unfortunately, some tests, although still useful in establishing relative performance, are not overly accurate nor precise. They provide a general sense of what the conditions are. Pencil hardness is a good example. Even when controlling for the variables, it only provides an approximate range of hardness.
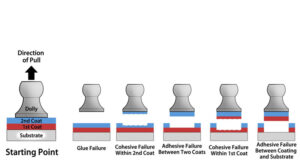
The tape adhesion test is another good example of a useful but somewhat misleading test. The tape adhesion test is dependent upon the peel strength of the decoration bond being less than the peel strength of the adhesive. Tapes vary significantly in adhesive strength. Even using the same tape with different decoration surfaces within the same technology, the bond between the tape and the decoration varies significantly. So, it is useful for process control. It is very poor for comparisons unless the pull of force is determined to be the same and technique is closely controlled. A better way of measuring adhesive strength is with an anvil pull test, ASTM D4541 – the test method for pull-off strength of coatings. This test takes longer but provides both pull-off force and information on the mode of failure (Figure 6).
Looking in the rear-view mirror
Testing too often is the scar tissue of past mistakes. When a problem is identified, a test is established to determine if a part is susceptible to this cause. Since these are the result of field failures, they can linger in test specification long after the risk is gone from the environment or when a new technology not susceptible to the failure mode is adopted. The environment is always changing. Even with known risks such as sunscreen, the chemical mix – including the active agents – tend to change over time. Previous articles have discussed how this can lead to inconclusive or misleading outcomes.
Even when issues are identified, change sometimes comes slowly. For instance, it took nearly a decade for all the major manufacturers in the automotive sector to include some form of testing for sunscreen. It takes significant effort to monitor potential risks and develop appropriate test methods. This means that the specifications may not include or correctly evaluate emerging risks.
Situational awareness for plastic decoration engineers
Risk of a new failure mode often depends upon one of the hardest issues to predict – people’s behavior. Tied closely to this are new innovations in response to current conditions. A recent example is the COVID-19 pandemic. As one would expect, the amount of cleaning and sterilization – both with approved and unapproved cleaning chemicals – has increased dramatically. As a result, customers are adding increased testing using the current chemicals found in the field.
What was less expected was the development use of UV-C for sterilization of surfaces both in hospitals and airlines. This has led both to unanticipated polymer damage and pigment fading. UV-C does not exist naturally (the atmosphere filters it out) so most testing specifically excludes it. As a result, most plastics and decoration are not compounded to survive it. Since UV-C is effective at sterilizing surfaces, it has found quick acceptance in the field. Unfortunately, it also damages surfaces, and no established standards or universally accepted test methods exist. Several groups, such as the International Ultraviolet Association (IUVA), are addressing the need of repeatable test methods. The unexpected nature and speed of the changing environment have outpaced test development.
Personal care products are another area where change is continuous and needs to be monitored to ensure there are no unexpected risks. Chemical exposure from personal care and cleaning products can be difficult to measure since exposure can weaken the decoration, which will lead later to failure when an additional stress is applied. Latent failures are important, especially if repeated exposures occur.
Another easily overlooked issue is the combination of technologies needed to create some appearances. Failure to consider interfaces also can lead to missed potential problems. Is there a risk of rubbing or incompatible materials coming in contact with each other?
When producing a decorated plastic part, it is useful to understand just how it interfaces with the finished salable product. When validation or verification testing is being completed, care should be taken to use actual production parts for all tests. These parts contain the most information about the materials and process.
Final thoughts
Testing is not just a gate to get through at the end of a development process, but, if understood and used correctly, a tool for making good decisions. All of this depends upon everyone involved understanding what the objective of the test is, understanding what information the test is providing and recognizing what the limits are to the testing. It is well worth the time needed to understand decorative part testing and equally important to consider the environment in which the decorated part eventually will function.
 Paul Uglum has 43 years’ experience in various aspects of plastic materials, plastic decoration, joining and failure analysis. He owns Uglum Consulting, LLC, working in the areas of plastic decoration and optical bonding. For more information, send comments and questions to [email protected].

